How Artists Portray Humans & Nature
The lesson plans for Humans and Nature were designed to encourage student interaction, engagement, and exploration of their surrounding environment. The works of art chosen depict Nature through idealized views and sometimes as a chaotic force to be reckoned with. The projects were designed to encourage students to embrace the physical characteristics of the world around them and to emphasize the connection that we all share as humans with one another and with our environment. The assessments were utilized to gauge student learning, involvement, and to explore essential questions. A common theme shared by all of the lesson plans is the influence of Nature on works of art and its ability to transform, inspire, and promote harmony.
See my Powerpoint on this topic below
See my Powerpoint on this topic below
| how_artists_portray_humans__nature.pptx |
Unit #1 The World Outside Your Door
(Can be adapted for Jr. High or High School)
Big Ideas and Essential Questions:
1. How do artists depict the relationship between humans & nature?
2. What does the work say about our current relationship to the natural world?
3. Is nature portrayed as good or evil in this work?
4. What does the work tell you about the artist's culture, values or beliefs about nature?
5. How Do Artists Depict the third dimension on a two dimensional surface?
6. In what ways do artists show how the environment affects humans, or how humans affect the environment?
7. How can an artist express the power of nature?
Artists: Joseph Mallord William Turner, Winslow Homer,Thomas Hart Benton, Mary Cassatt, Henri Rousseau, John Copley, Berthe Morisot,
Van Gogh, Picasso, Grant Wood
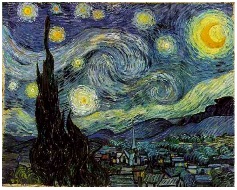
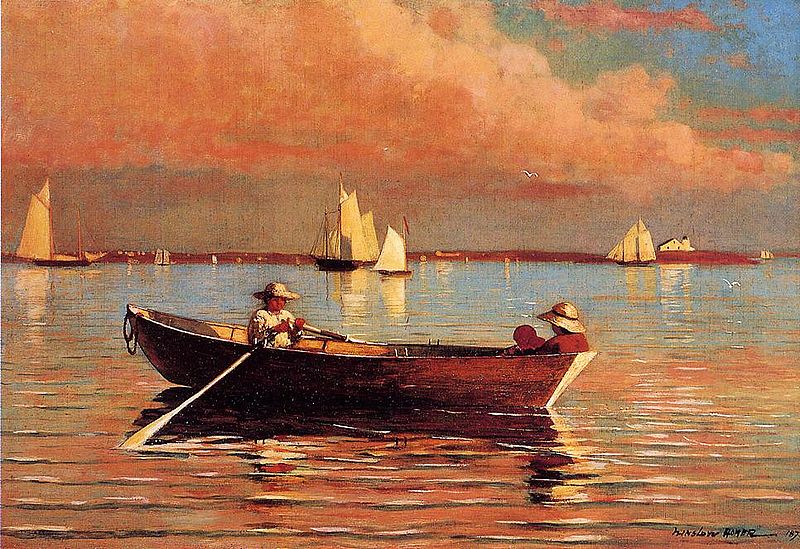
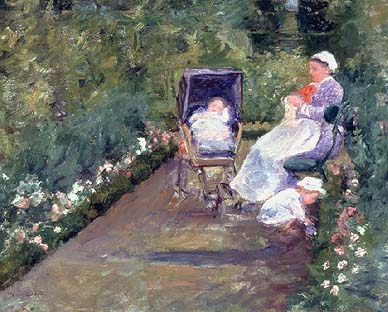
Henri Rousseau Surprise!Winslow Homer -Gloucester HarborMary Cassatt-The Nurse
Grant Wood-Paul Revere's RideVincent Van Gogh-The Starry NightPablo Picasso-Tragedy
Project A- Compare & Contrast Paintings About Humans & Nature
Procedure:
View slide show powerpoint above or individual images with the class. Students break into groups and are given a laminated copy of one of the above paintings. The group answers the questions below and reports back to the rest of the class until they compare and contrast all paintings.
Discussion Questions:
*For a copy of the above discussion questions I created a student handout for your groups. To get it click here:
Student Handout Sheet for Seascape.docx
Materials: Handouts, photographs of local areas, projector and artist power point above.
Writing Assignment: (Could be homework) Ask students to choose one of the paintings above and write a creative story about what is happening in the image. If they were there what would it smell like, sound like, feel like? What season is it? What time of day is it? What is the temperature? How do the people in the image feel about being out in nature in this image?
Assessment: Did student participate in class discussions, and group work? Does student demonstrate an understanding of how artists depict seascapes and landscapes differently from one another? Could the student interpret the artist's technique? Assessment can be on class participation, group work, writing assignment, and a written test.
Project B- Watercolor Techniques Squares
Procedure:
Cut watercolor paper into 3 inch squares and give each student 9. Demonstrate and then have them practice one technique on each square (writing names of each on the back first). Do one with a wet-on-wet, wet-on-dry, graduated wash (to be used for sky later), salt, fan brush, etc. Later, when dry, these squares are hole punched in one corner, and strung together with yarn. Students now have a little sample of techniques to refer to later when creating their painting.
Materials: watercolor palettes, watercolor paper, brushes, water, masking tape for borders, yarn, one-hole punch.
Assessment: Did the student create each technique, with good craftsmanship and care? Are names identifying each technique are on the back of each square, tied together? Student can do self or peer assessment on this.
Project C- Paint Your Own Watercolor Seascape or Landscape Paintings
Procedure:
Have students close their eyes and imagine themselves at their favorite local landscape or beach. Then have them write a detailed description of the place.
Provided with reference images of local beaches, and landscapes seen in your area, students will create their own watercolor seascape or landscape paintings using all the techniques practiced in the squares, while keeping the big ideas and essential questions in mind while working. Play soothing beach sounds music found on YouTube, with crashing waves and seagulls in the background as they paint. This really creates a great environment to put them in the present moment. Hearing the sounds helps trigger more feelings and memories associated with the beach that they might include. Have students write a short artist's statement explaining their location, and feelings about the place they have chosen. Frame images and exhibit, display beside written artist's statement.
Materials: Watercolor palettes, watercolor paper, brushes, water, masking tape, photos of beaches or landscapes from local area, soothing beachy music on You-Tube.
Assessment:
Have students created a painting based upon the environment that they described? Does the painting express the artist's feelings about the environment in a way that informs the viewer? Is the color palette in harmony with the artist's statement? Did the student make a carefully composed image? Have they used at least five of the watercolor techniques done in project 2? Has the student used the artistic methods discussed to make the image look three-dimensional? Does the work show good craftsmanship? Has student preplanned sketches, taken time necessary? Can student demonstrate they have given thought to the big ideas and essential questions? Part of the assessment can be informal- student reflection sheet. Part can be teacher or peer assessment-sheet attached below.
Cool Links For This Lesson:
Beach/Ocean sounds to paint by:
http://www.youtube.com/watch?v=4YU0ER3ruGw
http://www.youtube.com/watch?v=fHZVBJqMtkE&feature=related
http://www.youtube.com/watch?v=n7fLFcwN9m8
John Copley- Watson & the Shark
http://www.metmuseum.org/special/americanstories/objectView.aspx?sid=2&oid=3
http://www.mfa.org/collections/object/watson-and-the-shark-30998
Grant Wood- Midnight Ride of Paul Revere
http://www.metmuseum.org/works_of_art/collection_database/modern_art/the_midnight_ride_of_paul_revere/objectView.aspx?&OID=210008802&collID=&vw=0
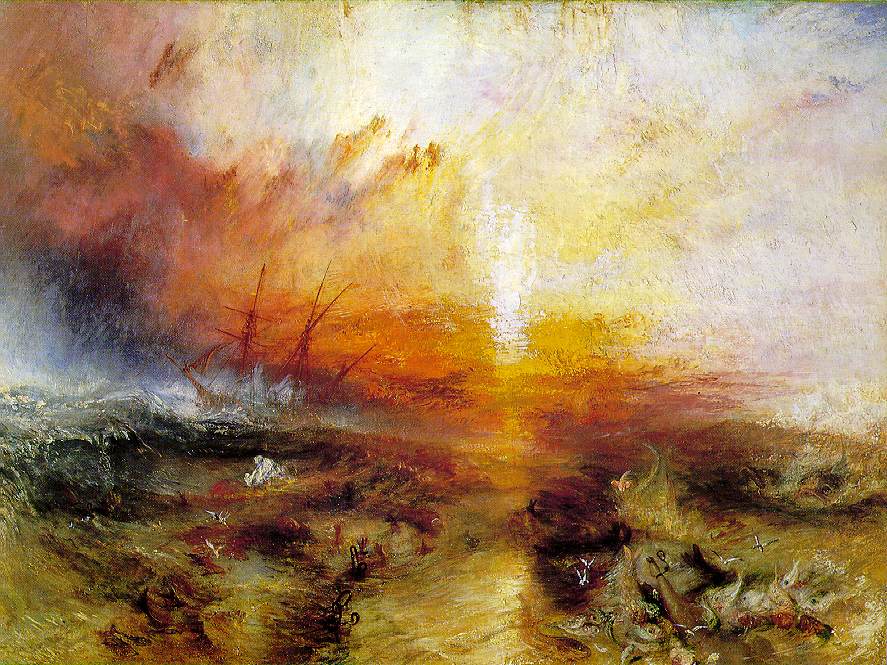
Joseph Mallord William Turner- The Slave Ship
http://en.wikipedia.org/wiki/The_Slave_Ship_%28painting%29
excellent you tube video:
http://www.youtube.com/watch?v=B4S8ldmc4Hw
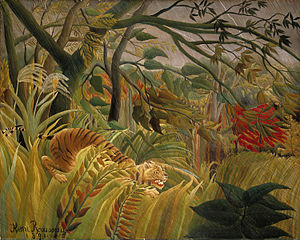
Henri Rousseau- Tiger In A Tropical Storm (Surprised!)
http://www.henrirousseau.org/
Students create digital Rousseau-style jungles on the computer: http://www.nga.gov/kids/zone/jungle.htm
(They LOVE this!)
Winslow Homer: Breezing Up
http://en.wikipedia.org/wiki/File:Winslow_Homer_003.jpg
http://www.winslow-homer.com/
http://www.nga.gov/feature/homer/
Mary Cassatt: The Nurse
http://www.metacafe.com/watch/1332143/mary_cassatt_paintings/
http://www.biography.com/impressionists/cassatt-bio.jsp
Thomas Hart Benton: Country Dance
http://thehomeschoolmagazine.com/How_To_Homeschool/articles/301.php
http://www.pbs.org/kenburns/benton/timeline/
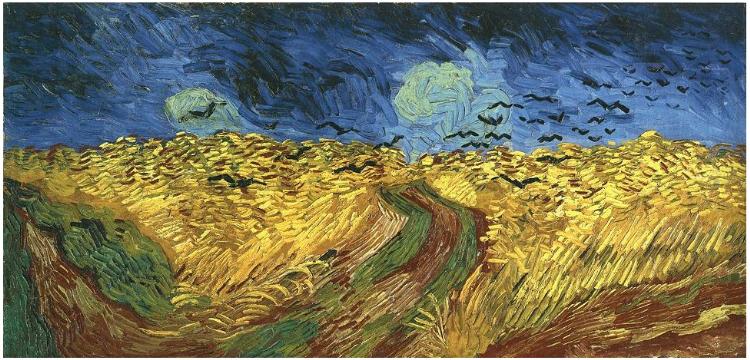
Vincent Van Gogh:Wheat field with Crows, The Starry Night
http://www.vangoghgallery.com/
http://www.vangoghgallery.com/lesson_plans/
http://www.biography.com/articles/Vincent-van-Gogh-9515695
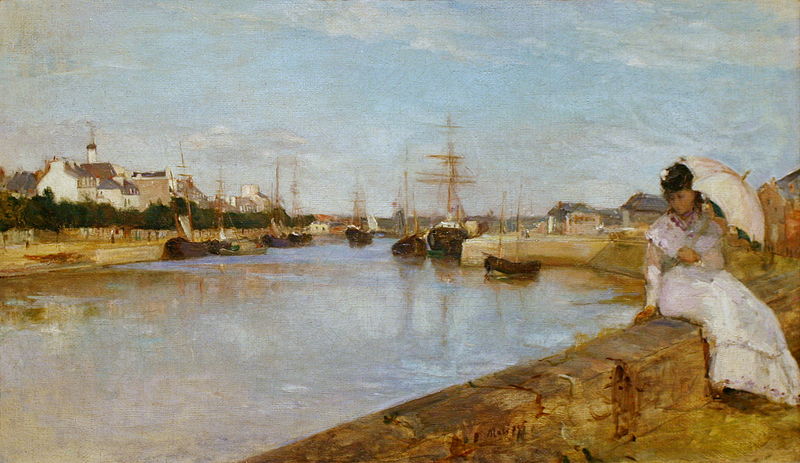
Berthe Morisot: The Harbor at Laurient
http://en.wikipedia.org/wiki/File:Berthe_Morisot_The_Harbor_at_Lorient.jpg
Picasso: Tragedy
http://www.squidoo.com/pablo_picasso
http://www.nga.gov/education/picteach.shtm#lesson%202
(Can be adapted for Jr. High or High School)
Big Ideas and Essential Questions:
1. How do artists depict the relationship between humans & nature?
2. What does the work say about our current relationship to the natural world?
3. Is nature portrayed as good or evil in this work?
4. What does the work tell you about the artist's culture, values or beliefs about nature?
5. How Do Artists Depict the third dimension on a two dimensional surface?
6. In what ways do artists show how the environment affects humans, or how humans affect the environment?
7. How can an artist express the power of nature?
Artists: Joseph Mallord William Turner, Winslow Homer,Thomas Hart Benton, Mary Cassatt, Henri Rousseau, John Copley, Berthe Morisot,
Van Gogh, Picasso, Grant Wood
Henri Rousseau Surprise!Winslow Homer -Gloucester HarborMary Cassatt-The Nurse
Grant Wood-Paul Revere's RideVincent Van Gogh-The Starry NightPablo Picasso-Tragedy
Project A- Compare & Contrast Paintings About Humans & Nature
Procedure:
View slide show powerpoint above or individual images with the class. Students break into groups and are given a laminated copy of one of the above paintings. The group answers the questions below and reports back to the rest of the class until they compare and contrast all paintings.
Discussion Questions:
- What is the difference between Seascapes & Landscapes?
- Does the artist make a political or social statement in their work? If so, what is it?
- Artists make a 2-D surface look 3-D by: overlapping objects, foreground/middle ground/background, atmospheric effects, perspective, relative size, and shading. Which of those elements do you see used your artist's painting?
- How do artists visually express something that can't be seen, such as wind or cold?
- Does the artist depict nature as violent, fierce and dangerous or beautiful and awe-inspiring? Is it good or evil?
- How does the artist depict the relationship between humans and nature in the painting? Is it harmonious?
- What way did the artist depict the light and weather in the image?
- Judging by the horizon line, what part of the picture did the artist emphasize? (can mention compositional elements, such as rule-of-thirds)
- How does the color palette chosen help the viewer understand the emotion intended by the artist? Does it seem positive or negative or something else?
- What story is being told here? Who are these people? Where are they? What do you think will happen next?
- Does this look like a place or scene similar or different than where we live here?
- What is the scale of the humans compared to the environment in this work? Why do you think the artist chose that scale?
- Why do you think the artist created this work?
*For a copy of the above discussion questions I created a student handout for your groups. To get it click here:
Student Handout Sheet for Seascape.docx
Materials: Handouts, photographs of local areas, projector and artist power point above.
Writing Assignment: (Could be homework) Ask students to choose one of the paintings above and write a creative story about what is happening in the image. If they were there what would it smell like, sound like, feel like? What season is it? What time of day is it? What is the temperature? How do the people in the image feel about being out in nature in this image?
Assessment: Did student participate in class discussions, and group work? Does student demonstrate an understanding of how artists depict seascapes and landscapes differently from one another? Could the student interpret the artist's technique? Assessment can be on class participation, group work, writing assignment, and a written test.
Project B- Watercolor Techniques Squares
Procedure:
Cut watercolor paper into 3 inch squares and give each student 9. Demonstrate and then have them practice one technique on each square (writing names of each on the back first). Do one with a wet-on-wet, wet-on-dry, graduated wash (to be used for sky later), salt, fan brush, etc. Later, when dry, these squares are hole punched in one corner, and strung together with yarn. Students now have a little sample of techniques to refer to later when creating their painting.
Materials: watercolor palettes, watercolor paper, brushes, water, masking tape for borders, yarn, one-hole punch.
Assessment: Did the student create each technique, with good craftsmanship and care? Are names identifying each technique are on the back of each square, tied together? Student can do self or peer assessment on this.
Project C- Paint Your Own Watercolor Seascape or Landscape Paintings
Procedure:
Have students close their eyes and imagine themselves at their favorite local landscape or beach. Then have them write a detailed description of the place.
Provided with reference images of local beaches, and landscapes seen in your area, students will create their own watercolor seascape or landscape paintings using all the techniques practiced in the squares, while keeping the big ideas and essential questions in mind while working. Play soothing beach sounds music found on YouTube, with crashing waves and seagulls in the background as they paint. This really creates a great environment to put them in the present moment. Hearing the sounds helps trigger more feelings and memories associated with the beach that they might include. Have students write a short artist's statement explaining their location, and feelings about the place they have chosen. Frame images and exhibit, display beside written artist's statement.
Materials: Watercolor palettes, watercolor paper, brushes, water, masking tape, photos of beaches or landscapes from local area, soothing beachy music on You-Tube.
Assessment:
Have students created a painting based upon the environment that they described? Does the painting express the artist's feelings about the environment in a way that informs the viewer? Is the color palette in harmony with the artist's statement? Did the student make a carefully composed image? Have they used at least five of the watercolor techniques done in project 2? Has the student used the artistic methods discussed to make the image look three-dimensional? Does the work show good craftsmanship? Has student preplanned sketches, taken time necessary? Can student demonstrate they have given thought to the big ideas and essential questions? Part of the assessment can be informal- student reflection sheet. Part can be teacher or peer assessment-sheet attached below.
Cool Links For This Lesson:
Beach/Ocean sounds to paint by:
http://www.youtube.com/watch?v=4YU0ER3ruGw
http://www.youtube.com/watch?v=fHZVBJqMtkE&feature=related
http://www.youtube.com/watch?v=n7fLFcwN9m8
John Copley- Watson & the Shark
http://www.metmuseum.org/special/americanstories/objectView.aspx?sid=2&oid=3
http://www.mfa.org/collections/object/watson-and-the-shark-30998
Grant Wood- Midnight Ride of Paul Revere
http://www.metmuseum.org/works_of_art/collection_database/modern_art/the_midnight_ride_of_paul_revere/objectView.aspx?&OID=210008802&collID=&vw=0
Joseph Mallord William Turner- The Slave Ship
http://en.wikipedia.org/wiki/The_Slave_Ship_%28painting%29
excellent you tube video:
http://www.youtube.com/watch?v=B4S8ldmc4Hw
Henri Rousseau- Tiger In A Tropical Storm (Surprised!)
http://www.henrirousseau.org/
Students create digital Rousseau-style jungles on the computer: http://www.nga.gov/kids/zone/jungle.htm
(They LOVE this!)
Winslow Homer: Breezing Up
http://en.wikipedia.org/wiki/File:Winslow_Homer_003.jpg
http://www.winslow-homer.com/
http://www.nga.gov/feature/homer/
Mary Cassatt: The Nurse
http://www.metacafe.com/watch/1332143/mary_cassatt_paintings/
http://www.biography.com/impressionists/cassatt-bio.jsp
Thomas Hart Benton: Country Dance
http://thehomeschoolmagazine.com/How_To_Homeschool/articles/301.php
http://www.pbs.org/kenburns/benton/timeline/
Vincent Van Gogh:Wheat field with Crows, The Starry Night
http://www.vangoghgallery.com/
http://www.vangoghgallery.com/lesson_plans/
http://www.biography.com/articles/Vincent-van-Gogh-9515695
Berthe Morisot: The Harbor at Laurient
http://en.wikipedia.org/wiki/File:Berthe_Morisot_The_Harbor_at_Lorient.jpg
Picasso: Tragedy
http://www.squidoo.com/pablo_picasso
http://www.nga.gov/education/picteach.shtm#lesson%202
| watercolor_seascape_project.docx |


Unit #2: Living In Harmony With Nature
Big Ideas and Essential Questions:
1. How do artists depict the interaction between humans & nature?
2. What does the work say about our current relationship to the natural world?
3. Is nature portrayed as good or evil in this work?
4. What does the work tell you about the artist's culture, values or beliefs about nature?
5. How Do Artists Depict the third dimension on a two dimensional surface?
6. Which works comment on social issues (criticize or praise society)? How have these artists expressed ideas and feelings, or faced issues about the environment?
Project A: Outdoor Scenic of Your Community
Objective:
To provide contexts for observing and discussing ideas about humans interaction and relationship with the natural environment, and addressing ecological issues in art. In particular, students will learn how artists depict the environment and their community in which they live.
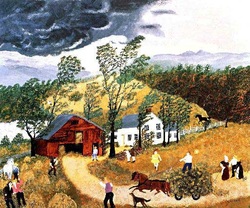
Artist: Grandma Moses
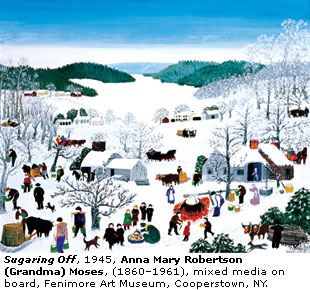
Grandma Moses was born on September 7, 1860 as Anna Mary Robertson. She became the mother of 10 children, and lived as a farmer's wife in the country. Self-taught, she painted over 1500 paintings even though she didn't start painting seriously until her seventies. Her style of painting was called American Primitive. Grandma Moses liked to paint simple scenes of everyday life such as the farm where she lived in all different seasons. She mostly painted very colorful outdoor scenes, depicting people attending country fairs, riding sleighs, making maple syrup, quilting, or celebrating holidays. Eventually she became famous and received awards from President Truman and was on the cover of Life Magazine. She died at age 101.
Introduction: Show students examples (posters or online) of Grandma Moses artwork. Discuss topics below. Grandma Moses could also be compared with Norman Rockwell and Currier & Ives.
.


Grandma Moses
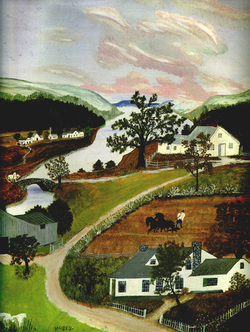
Discussion: Consider the work of Grandma Moses. What emotion do these works express about natural environments? What is your environment? Start with big environments and work to smaller ones. You are part of the universe, Milky Way, solar system, Earth, continent, country, state, county, town, community, neighborhood, house, room, and finally, yourself. Notice how your environments start out with natural elements, evolve to human-made, and return to natural. Environments can be created by natural climatic conditions or be human-made. Environments can have both positive and negative influences on people. Discuss "primitive" folk art, and how Grandma Moses depicted space and composed her rural landscapes thru repetition of forms. Talk about how art is made sometimes from an artist's memory of an event or time in their life. Artists also portray different seasons in nature.
Important Works:
Procedure: Students will create their own outdoor scene of people interacting in nature, based from a memory of their own childhood. (Optional: If this scene is of the winter season, they could be painted, photographed or scanned, and put on Artsonia or Shutterfly to create holiday cards for students to give to family, or offered for sale as a fundraiser for the arts dept. or charity.)
Students work with a partner and create a list of ideas for themes. Discussion/ Prompt: What kinds of activities do they do outside? Play basketball with friends in the driveway, play soccer at the town field with their team, have a cookout or picnic with family, go on the swingset, walk their dog, sledding with their friends, making a snowman? Have them draw a scene from their own life as Grandma Moses did.
Materials: White drawing paper, choice of media- colored pencils, markers, acrylic or watercolor paint, or oil pastels, pencil, rulers, & black sharpie markers for outlining if desired, salt, white sparkles or glitter for snowy effect.
Assessment: Did the student use repetitive forms and an interesting composition? Is the theme from everyday life? Is the pallette colorful and vibrant? Does the work express an emotion about the place and subject?
Recommended Websites:
Vocabulary Terms:
American Primitive
Folk Art
Landscape
Community
Composition
Rural
For Assessment: Student Reflection sheet I created is attached:
Important Works:
- Sugaring Off, 1943
- Wash Day, 1945
- A Beautiful World, 1948
- The Thunderstorm, 1948
- The Old Checkered House in Winter, 1950
Procedure: Students will create their own outdoor scene of people interacting in nature, based from a memory of their own childhood. (Optional: If this scene is of the winter season, they could be painted, photographed or scanned, and put on Artsonia or Shutterfly to create holiday cards for students to give to family, or offered for sale as a fundraiser for the arts dept. or charity.)
Students work with a partner and create a list of ideas for themes. Discussion/ Prompt: What kinds of activities do they do outside? Play basketball with friends in the driveway, play soccer at the town field with their team, have a cookout or picnic with family, go on the swingset, walk their dog, sledding with their friends, making a snowman? Have them draw a scene from their own life as Grandma Moses did.
Materials: White drawing paper, choice of media- colored pencils, markers, acrylic or watercolor paint, or oil pastels, pencil, rulers, & black sharpie markers for outlining if desired, salt, white sparkles or glitter for snowy effect.
Assessment: Did the student use repetitive forms and an interesting composition? Is the theme from everyday life? Is the pallette colorful and vibrant? Does the work express an emotion about the place and subject?
Recommended Websites:
- For printable crossword puzzles, word searches, games, worksheets and even tests on Grandma Moses: http://www.songsofpraise.org/crossword.php?puzzleid=196
- http://www.eduplace.com/kids/mw/wr/6/wr6_07.html
- http://www.artsconnected.org/artsnetmn/environ/index.html
- Kallir, Jane. Grandma Moses: The Artist behind the Myth. New York: Artline, 1982.
- Rodgers, David. "Moses, Grandma". The Oxford Companion to Western Art. Ed. Hugh Brigstocke. Oxford University Press, 2001
- Bass, Ruth. Grandma Moses. Grove Art Online. Oxford University Press, 23 July 2005.
- Johnson, Mark. Grandma Moses in the 21st Century. Arts & Activities, 3 (4), March 2001.
Vocabulary Terms:
American Primitive
Folk Art
Landscape
Community
Composition
Rural
For Assessment: Student Reflection sheet I created is attached:
| grandma_moses_reflection.doc |
Project B: Objects from Nature
Big Ideas & Essential Questions:
- To help students understand how artists use objects from nature as inspiration.
- Artists can make a statement about our relationship to nature and the environment with their art.
- Another is to understand the concept of how a small individual is part of a larger whole, and that the delicate web of nature and human is all connected.
- Understanding how artists arrange or display a final piece for exhibit matters to the overall message.
- There is often a meaning or message the artist is trying to convey with a political or social message.
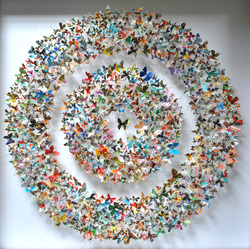
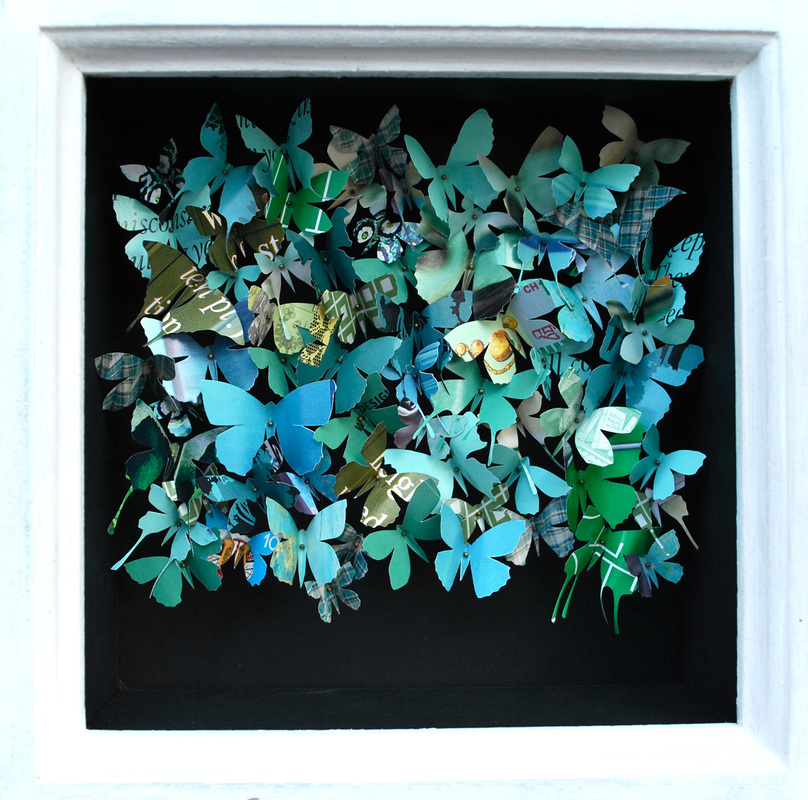
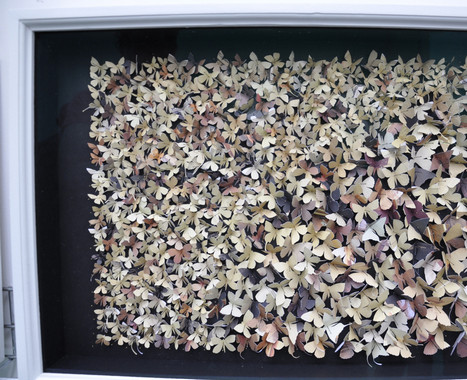
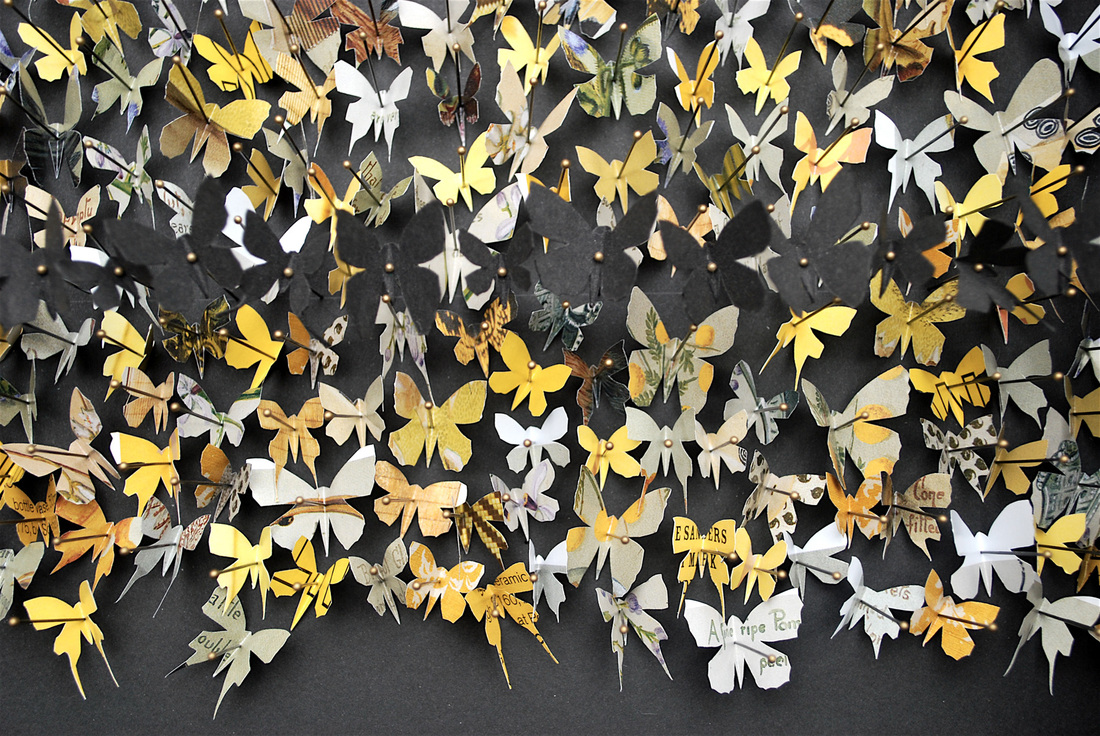
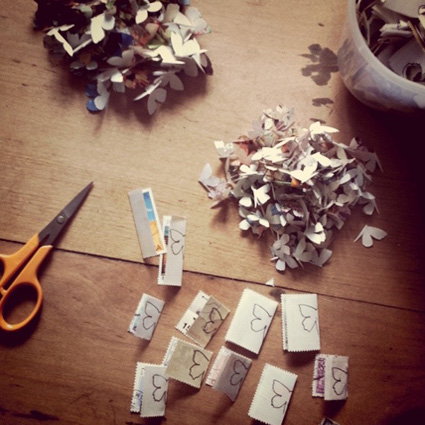
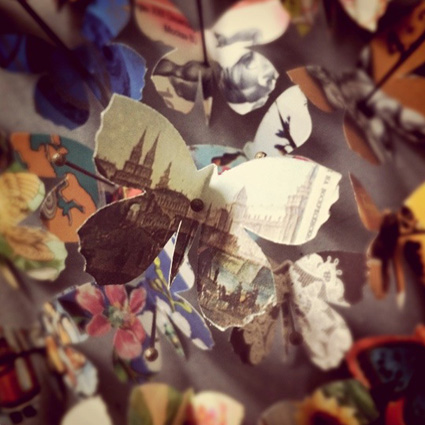
Contemporary Artist: Rebecca J. Coles
These lovely butterflies leap off the wall. They are created from old stamps, catalogues, magazines and wall paper. The artist just uses scissors to make three dimensional decorative forms. Hand cut paper silhouettes are re-sculptured into three dimensional decorative forms. By reshaping the paper's color, imagery and text, she deconstructs the paper ephemera, using only scissors, to produce intricate profiles which are then individually positioned to create unique art work.

Introduction: Show students the works of contemporary artist Rebecca J. Coles via her website below. Each student will create their own individual paper cut butterflies, and then they will be arranged and exhibited together as a group art project, in an aesthetically pleasing composition.
Discussion: Discuss how the artist uses forms from nature, such as the butterfly, using paper as her media. Discuss working in the 3-Dimensional format. Discuss the history of paper-cutting as art back to colonial silhouette portraits. Discuss the actual details of the anatomy of a butterfly. (Could be linked as a cross-curricular project with a science class. Interesting to connect with Monarch Butterfly Migration.) Talk about the fact that one small individual may seem small, but when put together as a group, it becomes something much more important and powerful. Think up examples of this phenomenon. You can also go into discussions about symmetry, shape, positive and negative space, and even pattern if you wish to color them too. You can also discuss what meanings, messages, and metaphors could be hidden in this type of art. Have a student write down a list of what is decided from this discussion for display later. The metaphor of transformation would be excellent to point out. Also, bring up the topic of making art with recycled materials such as magazine and newspaper.
Materials: Reference images of butterflies, or have older students research various butterfly shapes. Scissors, or cutting blades and mats (for older students), various types of paper, newspaper, magazines, etc.
Procedure: Using actual butterfly images for reference, have students sketch various examples of butterflies in their sketchbook. Once final design is decided, student should draw the design on pastel colored paper, magazines, newspaper, and various other paper types. Proceed to cut three to five individual butterflies cut from various types paper, being true to the actual shape of a real butterfly. It helps to fold the paper in half to get two sides even. After the whole class had created five images, decide as a group how they should be displayed together. What shape should they be in? Create the group exhibit together, and include statements about what the group comes up with for its meaning.
Assessment: Did student participate in group discussion above. Did student research shapes and silhouettes of real butterflies? Did they create at least three sketches in order to become familiar with the shapes first? Did student create butterfly silhouette with good craftsmanship and attention to detail? Did student participate in the arrangement of the final group exhibit?
Recommended Websites: http://www.rebeccajcoles.co.uk/
http://www.nwf.org/Wildlife/Wildlife-Library/Invertebrates/Monarch-Butterfly.aspx
http://www.thebutterflysite.com/butterfly-migration.shtml
http://animalcrossing.wikia.com/wiki/Yellow_Butterfly
http://www.treehugger.com/files/2011/09/recycled-paper-origin.php
http://outdoors.webshots.com/album/174741995TBWgqB
http://www.originuk.org/exhibitor/rebecca-j-coles-0
Resources: Coles, R. J. (2011). Retrieved September 20, 2011, http://www.rebeccajcoles.co.uk/
